
With the increasing hype of trends like AI and digital transformation, companies have become data-driven. They have started relying on data and analytics instead of gut feelings, and Data Science has emerged as a lucrative profession. There are 2.72 million job openings for data scientists at present, and this demand will only go higher. If you also want to make a career in Data Science, this is the right time to upgrade your skills. Learning SQL for Data Science is the first step in doing so.
SQL is a standard programming language that we use for managing and storing structured data. You can add, delete, or manipulate data faster using it. You can even refer to this article if you want to learn more about SQL and understand why businesses widely prefer it.
Why Is SQL Important for Data Science?
2.5 quintillion bytes are the amount of data we humans generate every day. However, none of this data is useful unless you can derive usable insights from it. Doing so will require extracting, processing, and analyzing tons of data, which is impossible unless you have tools that can help you manage and store this amount of data.
This is where SQL for Data Science comes into play. The language is fast and comprehensible. It is designed in such a way that it doesn’t appear much different from the English language to read and write.
Hence, you can use SQL to store, access, and extract massive amounts of data so that you can smoothly carry out Data Science operations.
Getting Started with SQL for Data Science
SQL Commands
SQL has a simple set of commands to modify data tables. Here are some of them:
- CREATE DATABASE: Used for creating a new database
- CREATE TABLE: Used for creating a new table
- INSERT INTO: Used for inserting new data into a database
- SELECT: Usedforselecting data from a database
- UPDATE: Used forupdating data in a database
- DELETE: Used fordeleting data from a database
- ALTER DATABASE: Used formodifying a database
- ALTER TABLE: Used formodifying a table
- DROP TABLE: Used for deleting a table
- CREATE INDEX: Used for creating an index to search an element
- DROP INDEX: Used for deleting an index
SQL Data Types
We specify the type of data we are inserting into the SQL database table with the help of a SQL data type. Following are the data types used in SQL.
1. Numeric Data Types
Signed and unsigned integers fall into the category of numeric data types. For example, the number 1 is a numeric data type, and so is the number -20.
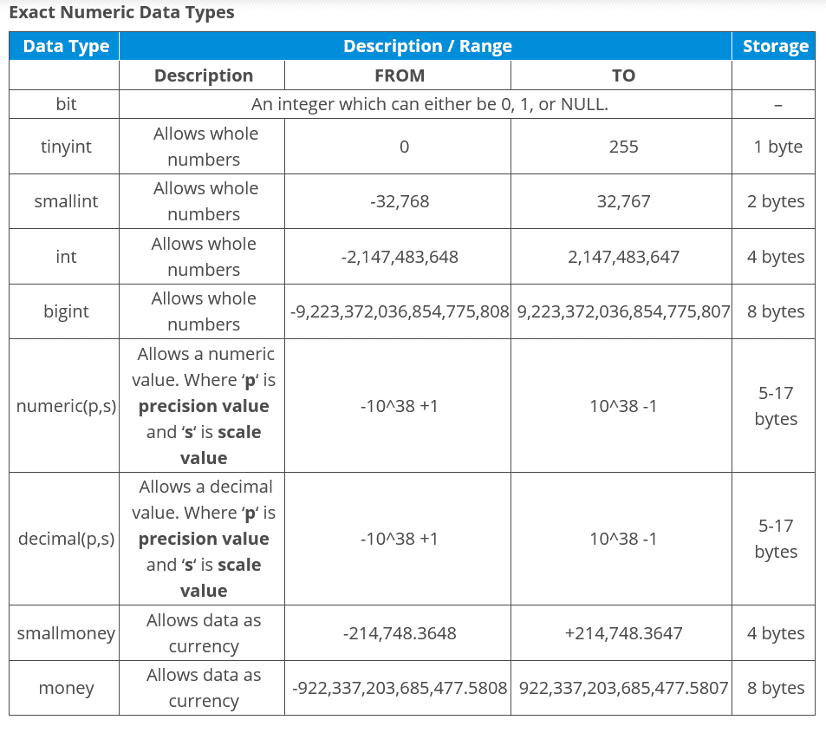
We can further divide numeric data types into two categories:
- Exact numeric in which we store the value as the exact representation of the value of that number
- Approximate numeric in which we store values in the form of float (p), Real, and double precision
The following tables explain both data types very well:

2. Character String Data Types
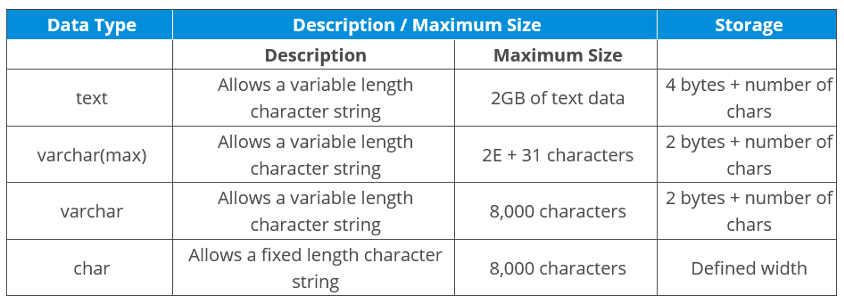
Character string data types allow characters of fixed and variable lengths in the database table. For example, the name “Data Science” is a character string data type.
The following table explains the character string data types:
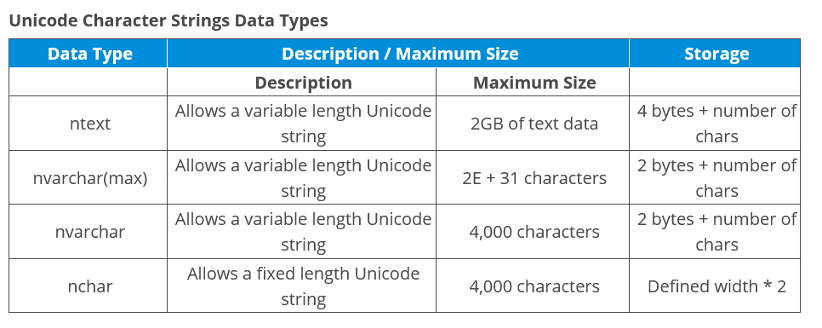
Unicode character string data types also fall under the category of character data types. They allow the consistent representation and handling of text in most writing systems of the world.
3. Binary Data Types
The sequences of octets or bytes fall under the category of a binary data type. In them, we store raw bytes as opposed to character string data types that are appropriate for storing text and numeric data types that store integers.
This table explains the binary data types:

4. Date and Time Data Types
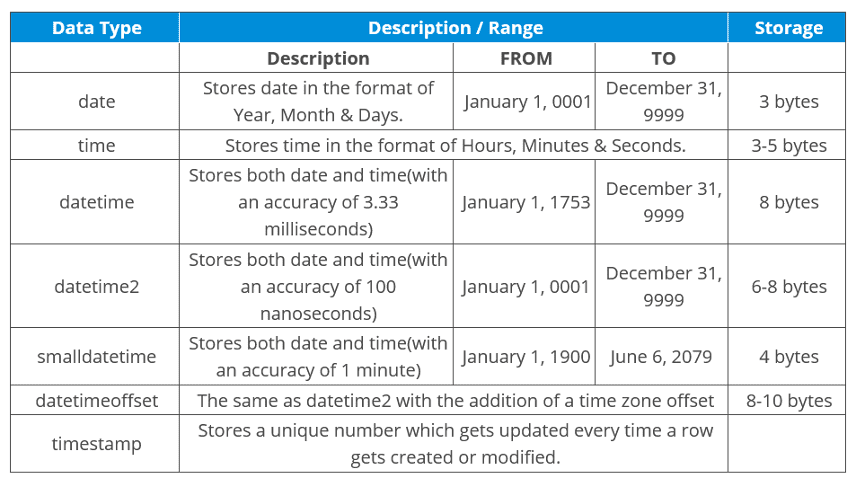
The date and time data type allows you to store important dates and times in different formats. For example, we can also save the date 15-August-1947 as August 15, 1947 and 15-08-1947.
To learn more about Date and Time Data types, refer to the following table:
5. Miscellaneous Data Types
The miscellaneous data types fall under neither of the above categories. The following table explains these data types very well:

Installing MySQL
Installing MySQL is the first step to getting started with SQL, and the process is easy. Just follow a series of simple steps mentioned below.
Step 1: Visit the MySQL official website and scroll down until you see the option to choose the operating system. Since I am using Windows 10, I will select Windows.
Step 2: You will see two download options: mysql-installer-web-community and mysql-installer-community. If you have a rich internet connection, you can choose the former. Otherwise, you should select the latter.
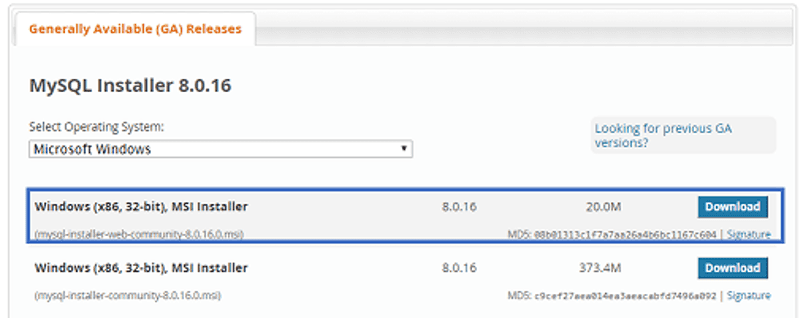
Step 3: Clicking the download button will redirect you to this page:

Choose No thanks, just start my download,and the MySQL installer will start downloading.
Step 4: Once the MySQL installer is installed, double click on it. The MySQL installer community will install, and you will see this screen:
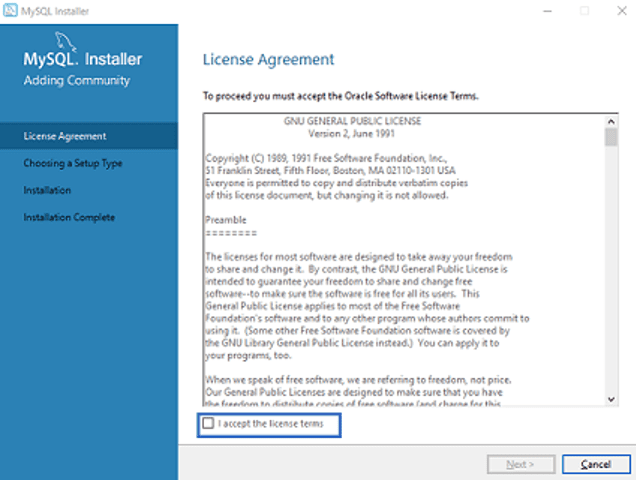
Check “I accept the license terms” and click Next.
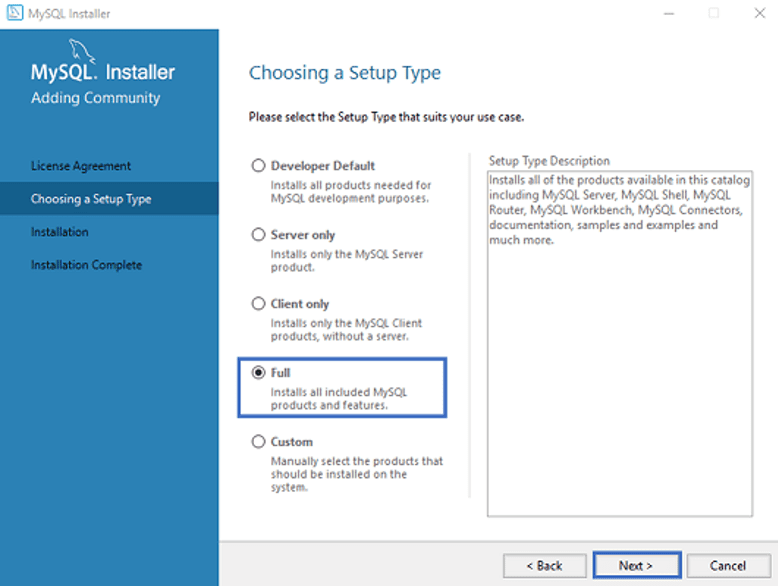
Step 5: The next screen will prompt you to select the setup type. From here, you can choose which features to install and which not.
I will choose the option Full as it will allow me to install all the products like MySQL Server, MySQL Shell, MySQL Router, MySQL Workbench, and MySQL Connectors along with the documentation, samples, and examples.
Once you have selected a setup type, click Next.
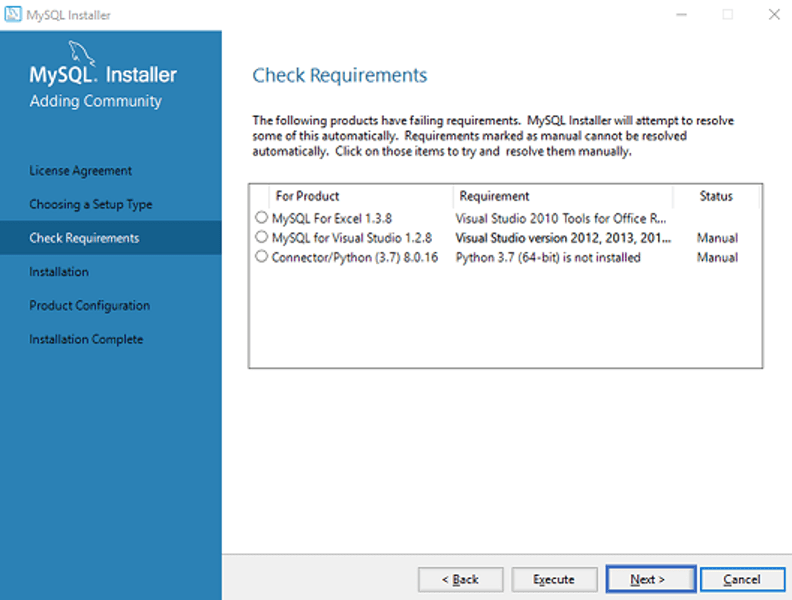
After you have clicked Next on the previous screen, chances are some features may fail to install due to requirement mismatch. You can either resolve these issues or skip them by clicking on Next. I prefer to skip them.
Click Next, and you will see the following confirmation:

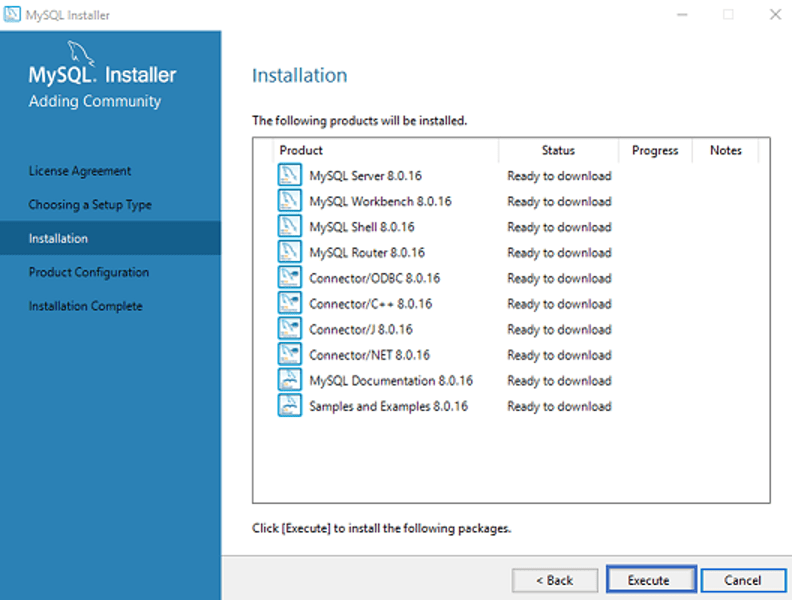
Click Yes, and the list of products that are being installed will appear in front of you. If the list has all the products you need, click Execute. The products will begin installing.
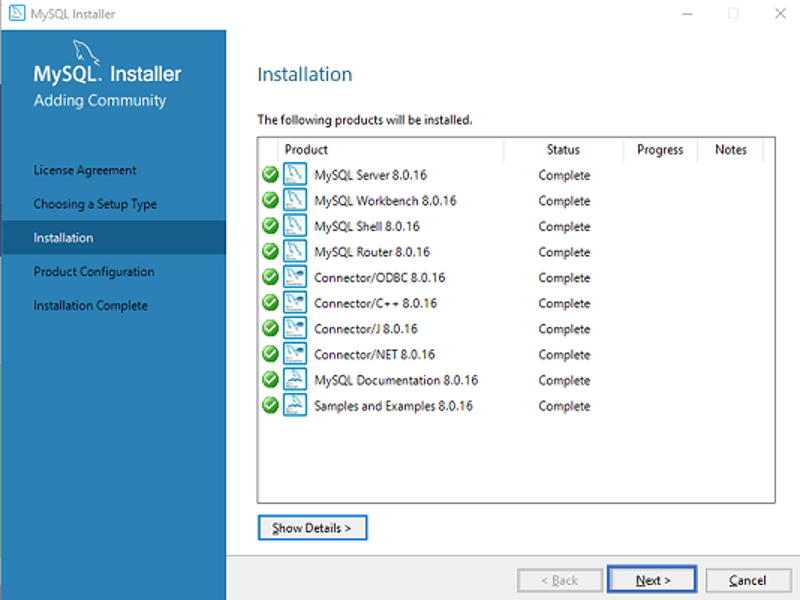
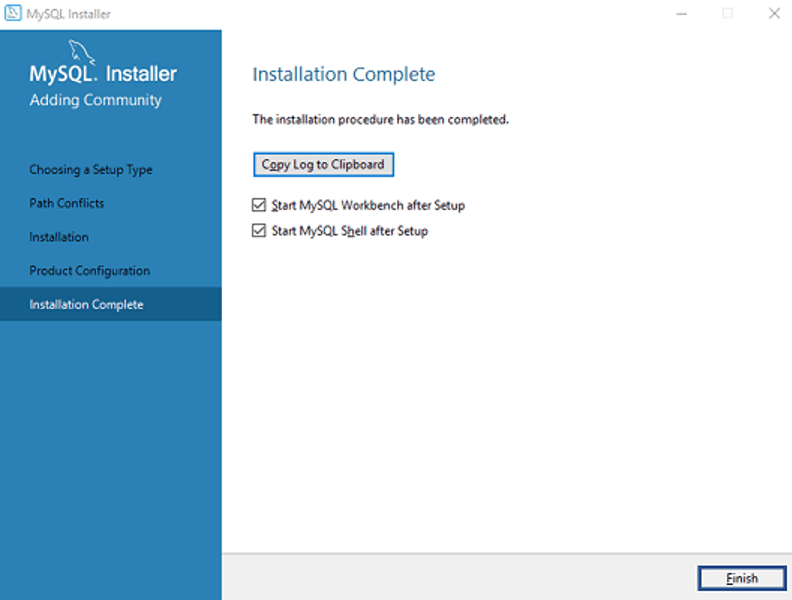
Once the installation is complete, click Next.
Server Configuration
The next step is to configure the MySQL server. Following are the steps for doing so.
Step 1: Click Next in the following dialog box.
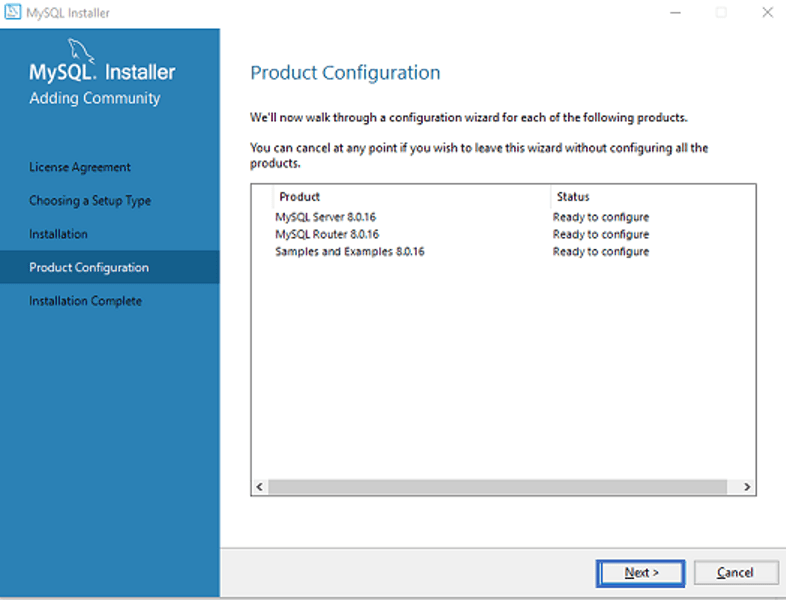
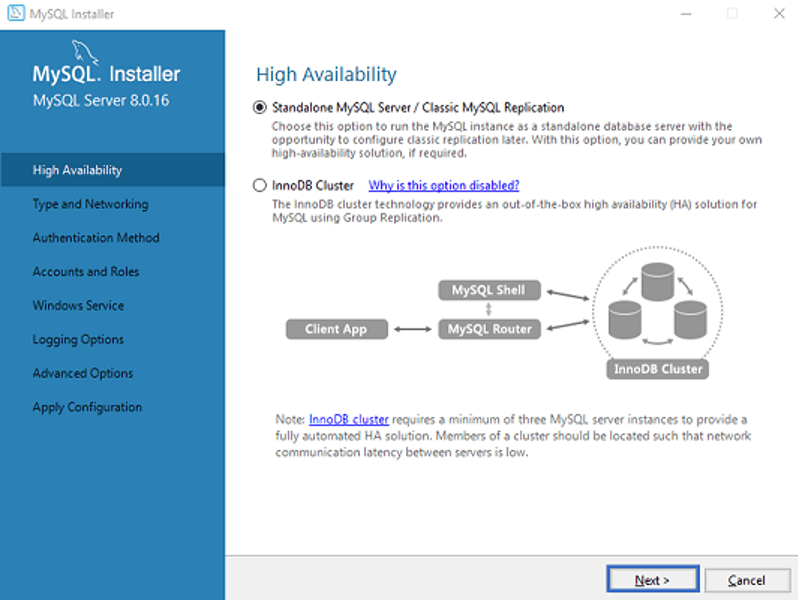
Step 2: Choose from Standalone MySQL Replication and InnoDB Cluster based on your requirements on the next screen. I will choose the former. Once selected, click Next.
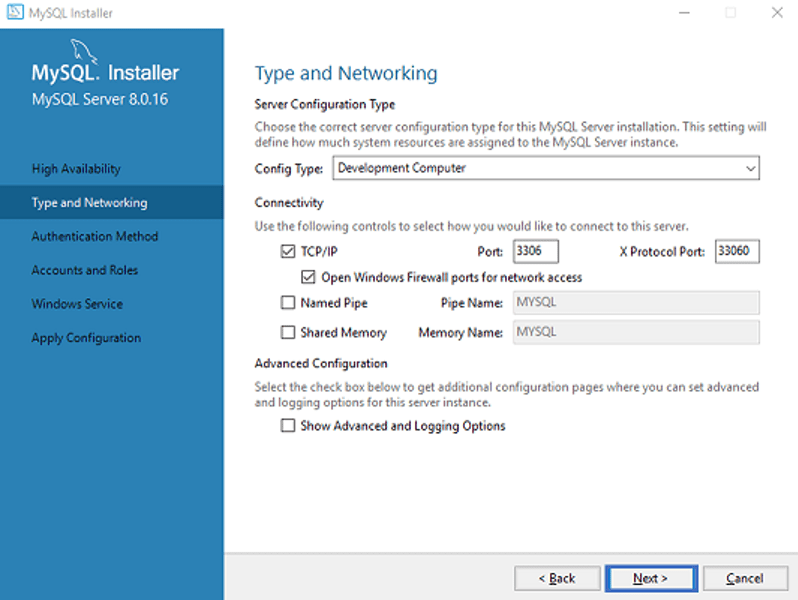
Step 3: The next screen will prompt you to choose a server configuration type and select how you would like to connect to this server. I would suggest you leave everything as it is and click Next.
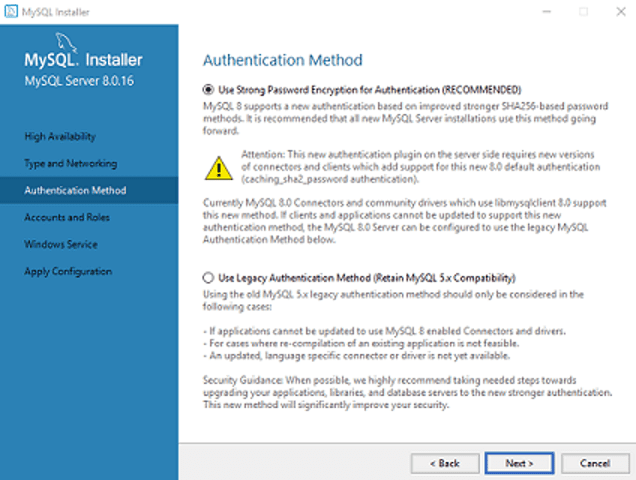
Step 4: In the next screen, you have to choose the authentication method. Here, I will select the first option and click Next.
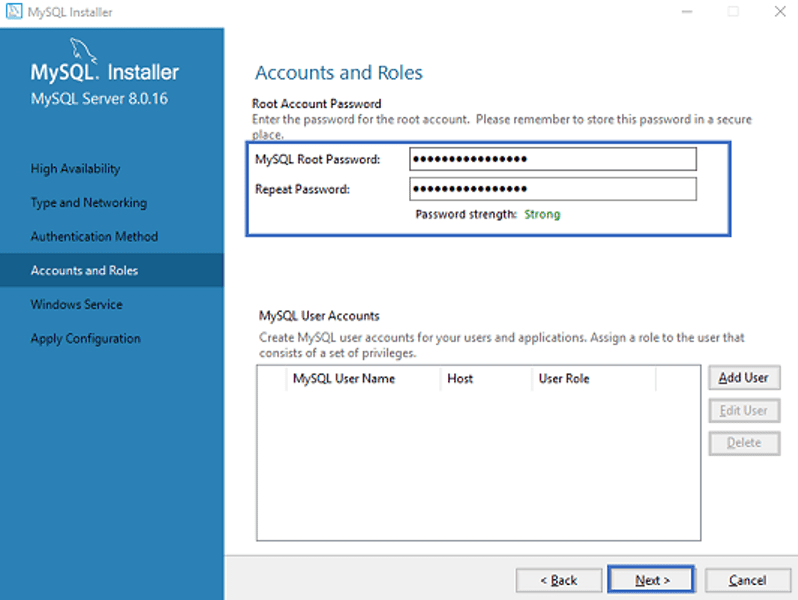
Step 5: Choose a MySQL Root password, and click Next.
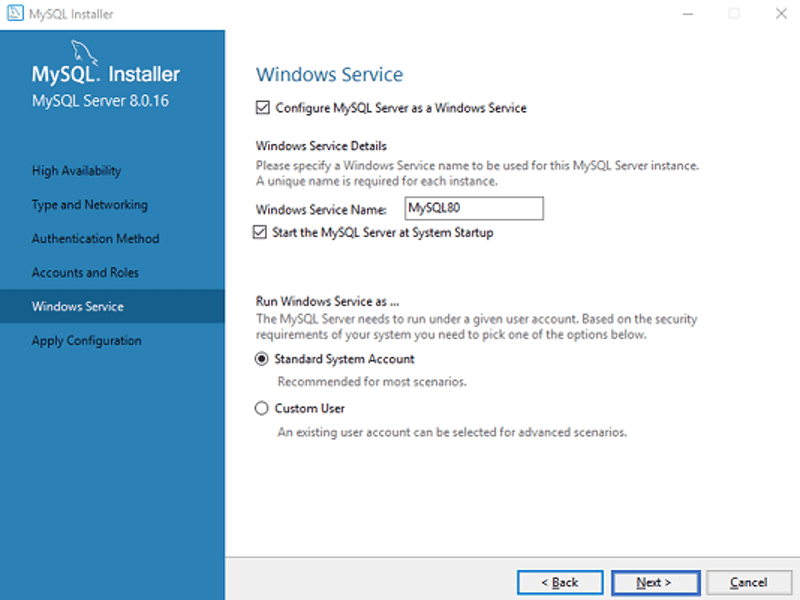
Step 6: Select whether you want to configure MySQL as a Windows Service or not. Here, I am going to leave settings as they are and click Next.
A list of configurations will appear on the next screen. If you agree with them, click Execute.
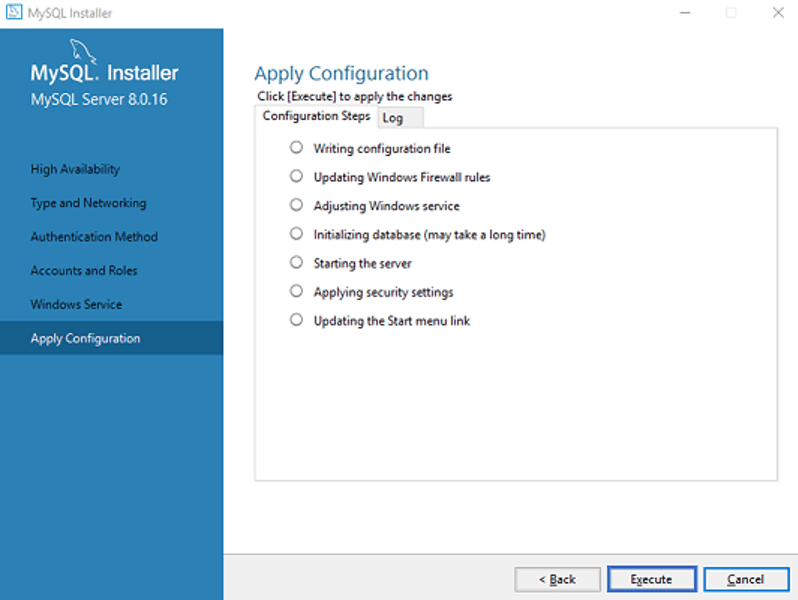
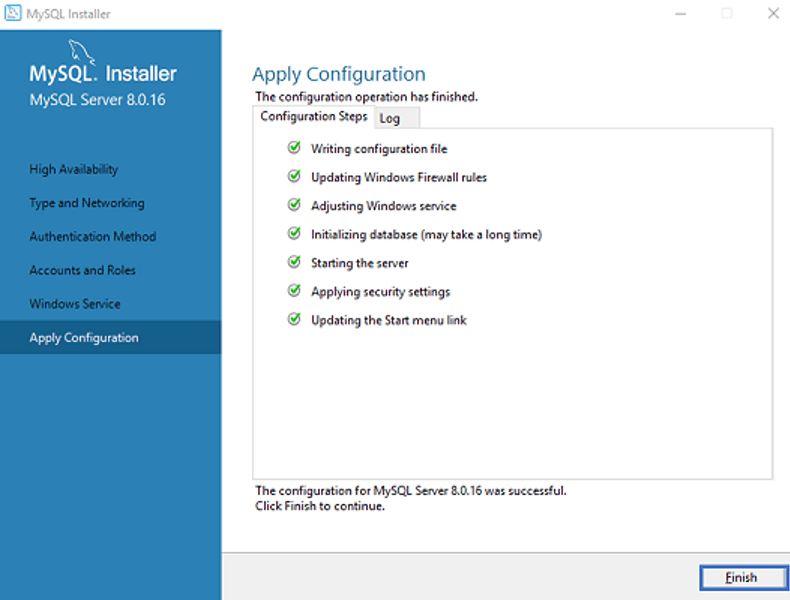
Once the execution is done, click Finish. This will finish the MySQL server configuration.
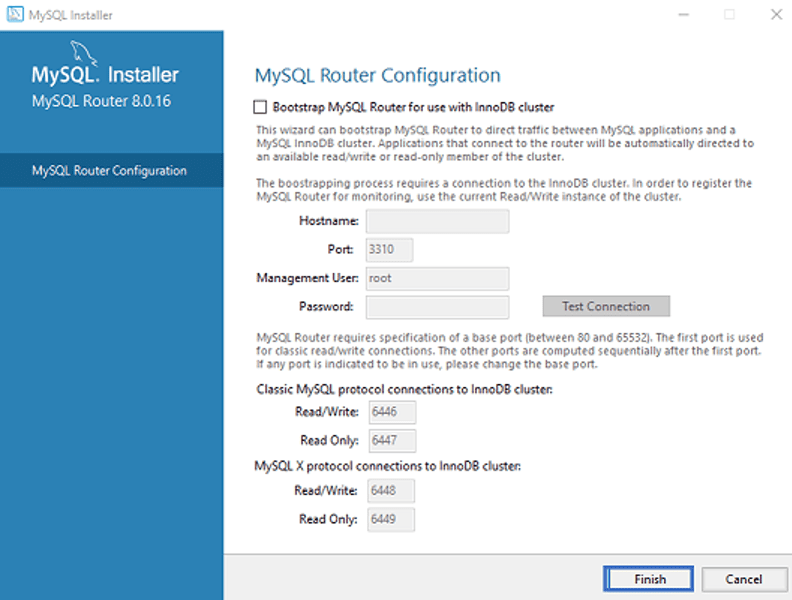
Step 7: On the next screen, you will see a screen asking you to configure the router. Click Finish.
Step 8: The next screen will prompt you to connect to the server. Enter the root password that you have set up in the previous steps and click Next.
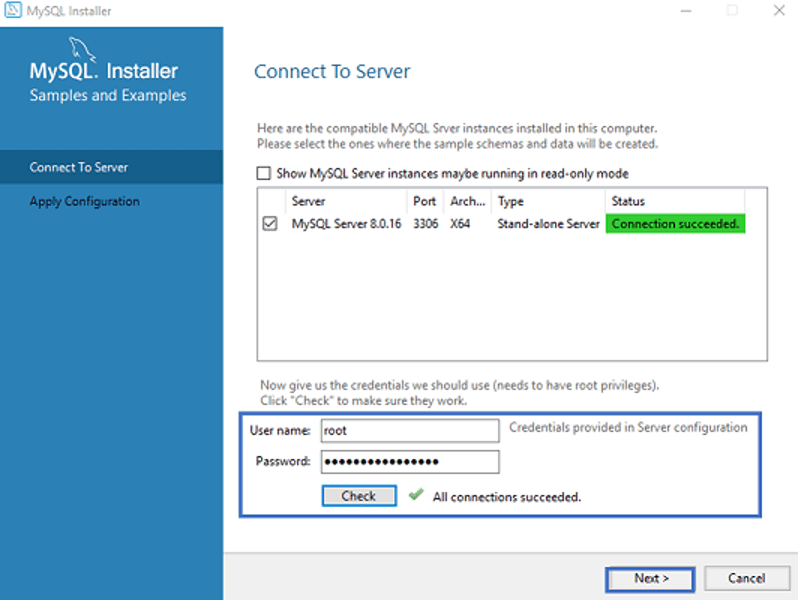
Then, check if the connection is successful by clicking the Check button. If it is successful, click Execute. Once the configuration is complete, click Next.
Step 9: Choose the configuration you want to apply and click Execute.
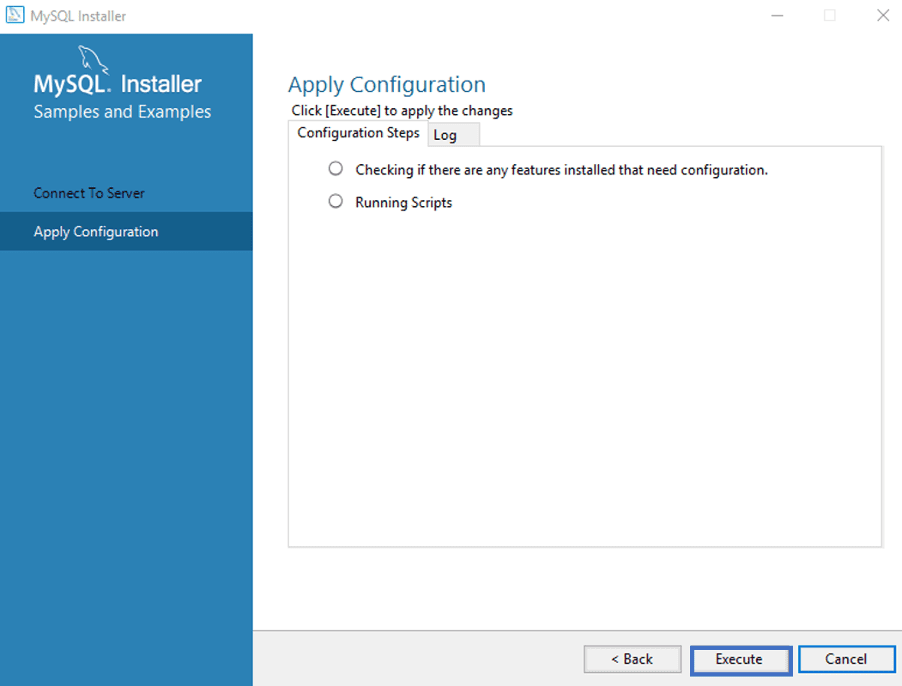
After the configuration is complete, the following screen will appear in front of you. Click Finish.
Checking Whether MySQL Was Installed or Not
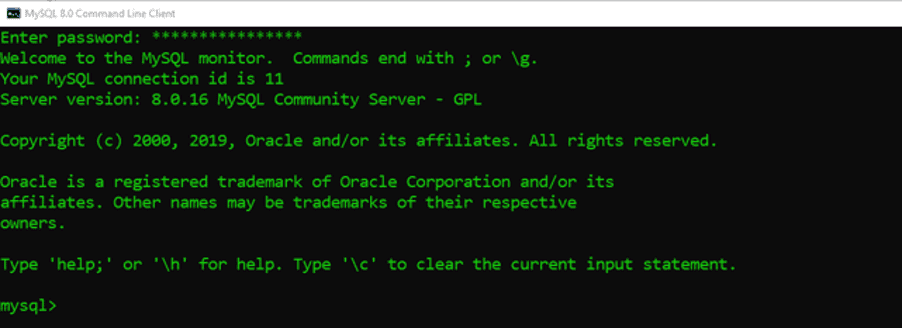
To check whether MySQL was installed on your PC or not, open the MySQL shell and enter the root password. This screen will appear if MySQL installs successfully.
Basic SQL Functions
1. Creating a SQL Database
A SQL database is where you will store data in a structured format. The following are the commands to create a SQL database using MySQL:
CREATE DATABASE College;
USE College;
Here, the CREATE DATABASE command will create the database College, and the command USE will activate it.
Note: We always writeSQL commands in capital letters and terminate them by a semi-colon.
2. Creating a Table with Required Data Features
The command for creating a table is as easy as creating a database. The only difference is that you will also have to define the variables or data features with their respective data types. Here is the command:
CREATE TABLE Course (Course_ID INTEGER NOT NULL PRIMARY KEY AUTO_INCREMENT, Course_name TEXT, Course_code INTEGER, Fee INTEGER);
In this SQL command:
- The CREATE TABLE command will create a table called Course.
- The table has four features Course_ID, Course_name, Course_code, and Fee.
- Each variable has its respective data types.
- Course_ID is the primary key.
You can check the details of the table by using the command DESCRIBE Course;

3. Inserting Data into the Table
The next step after creating a table is to fill it with some values. Following is the command for doing that:
INSERT INTO Course VALUES (NULL, “Public Speaking”, 101, 2500);
INSERT INTO Course VALUES (NULL, “Leadership Development”, 102, 2000);
INSERT INTO Course VALUES (NULL, “Planning and Strategy”, 103, 3000);
Here, we inserted five values into the
table course by using the INSERT INTO
command. We also specified each value.
We set the variable Course_ID to
NULL because it auto-increments from 1.
You can view the final result by using the command Select * from Course;

4. Modifying the Data Entries
What if you want to change the Fee for a course in the table? You can use the following command in that case:
UPDATE Course SET Fee = 4000 WHERE Course_ID=1;
Doing so will update the price of the first course, i.e., Public Speaking, from 2500 to 4000. You can modify other data entries in the same way.
Once done, you can view the updated table:
SELECT * FROM Course;

6. Retrieving Data
SQL also allows you to extract and retrieve data according to your business requirements. Following is the command you will need to use:
SELECT * FROM Table LIMIT N;
In the case of the table we have created, we can use this command as:
SELECT * FROM Course LIMIT 2;
This will retrieve data from the first two rows in the table.

Here is another command:
Select * FROM Course ORDER BY Fee ASC;
It will show all the values from the table in ascending order of the price variable.

Joining Rows in SQL
Till now, we have only covered the basic functions in SQL that are appropriate if you are managing and storing data in small databases. However, what if the database is too big? Retrieving data will be difficult in that case.
You can resolve this issue by using the JOIN clause. Using it, you can combine rows from two or more tables based on a similar column between them.
There are four types of joins in SQL:
- (INNER) JOIN
- LEFT (OUTER) JOIN
- RIGHT (OUTER) JOIN
- FULL (OUTER) JOIN
These diagrams explain each join in detail:

SQL Commands for Joining Two Table Rows Using the JOIN Clause
Following are the commands for joining two table rows using the JOIN clause:
INNER JOIN
SELECT columns FROM table1 INNER JOIN table2 ON table1.column=table2.column;
LEFT (OUTER) JOIN
SELECT columns FROM table1 LEFT [OUTER] JOIN table2 ON table1.column=table2.column;
RIGHT (OUTER) JOIN
SELECT columns FROM table1 RIGHT [OUTER] JOIN table2 ON table1.column=table2.column;
FULL (OUTER) JOIN
SELECT columns FROM table1 FULL [OUTER] JOIN table2 ON table1.column=table2.column;
You can refer to this link if you want to dig deeper into SQL Joins and understand them with the help of suitable examples.
It is also possible to join only the first row in two SQL tables. Doing so proves helpful in scenarios when we are aiming for specific searches, but complexities are involved.
For example, let’s assume you are preparing a report in which you need a list of students and the most recent course in which each student has enrolled. We have two tables Course and Students, and each student has taken many courses.
How will you retrieve the desired results from the database in such a case? Joining only the first row of the SQL table is the best solution to this problem. In case you are wondering how, here are four of the best ways to join the first row in SQL.
SQL for Data Science: The Takeaway
The demand for Data Science and six sigma jobs is at an all-time high in 2020. Both are one of the most promising careers in terms of job satisfaction, average salary, and growth opportunities. If you want to excel in these fields, learning SQL for Data Science is the first step.
This guide has given you an overview of everything you need to know for getting started with using SQL for Data Science. But it’s just the beginning. MySQL is an entire universe in itself. I would recommend you either enroll in an online course or get your hands on your old textbooks.
Also, SQL is all about practice. The more you do it on your own, the more you will learn. So, keep learning and keep practicing. Best of luck!
